If your soil is too heavy, compact and requires lots of aeration or exhibits deep cracking during drought and drainage issues during heavy rain – it means the soil is rich with ultra-fine clay particles, and this is not a problem that is possible to ignore.
We will be sharing a detailed overview of what to do and what not to do under any circumstance, but first let’s start with the basics! Experienced gardeners can skip this section and head straight for the solutions.
This article should serve to prevent mistakes, save you money and effort, and help you bring out the best from your soil.
The Basics of Soil Composition and Behavior
Soil physics is a whole science onto itself so we won’t go deep, but the basic principles are important and easy to understand.
Soil is a very complex system. Measured by volume in its natural state, it consists of 3 phases:
- The gaseous phase:
- Gas-filled gaps between mineral particles and aggregates (chunks).
- Soil “air” is very different in composition than the air we breathe every day, severely lacking in oxygen.
- The liquid phase:
- Soil water or rather “soil solution”, as it’s called, contains soluble substances as well.
- Together with the gaseous phase, the porous part of the soil makes up roughly 50% of the total soil volume.
- The solid phase:
- Mineral matter (usually 45-49% of soil volume) – Derived from weathered parent rock material.
- Organic matter (typically 1-5% of soil volume) – plant/animal remains in various stages of decomposition, as well as actual living organisms.
In almost all soils, mineral matter dominates by a large percentage, compared to the organics. Having just 5% of the solid weight be organic would already put that soil in the category of “organic-rich”, while 1-2% would be considered low organic content.
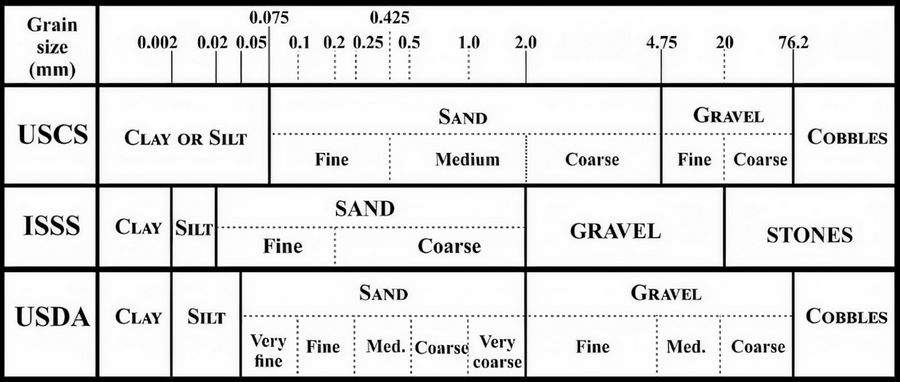
After removing water and the organic matter of the solid phase what we’re left with is a bunch of mineral particles of various sizes. These are what we call gravel, sand, silt and clay.
The most important for soil classification are:
- Sand: 0.05 – 2.0 mm diameter
- Silt: 0.002 – 0.05 mm diameter
- Clay: < 0.002 mm diameter
Soil Texture Basics
When classifying a soil, gravel and larger chunks of rock are not counted in the measurements of soil physical composition. The proportion of sand, silt and clay is what we are most interested in! This is what defines so called “Soil Texture” and can graphically be represented by a triangle in which each side is an axis measuring percentage (0-100%).
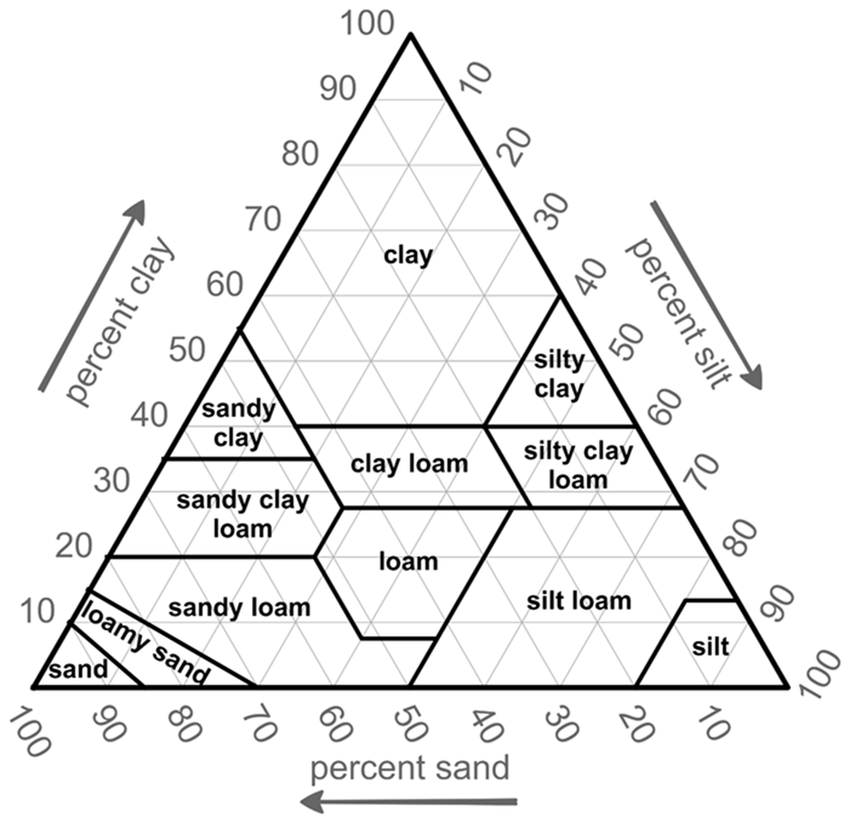
| Note:
This is the official classification and proportional definitions recognized by USDA. There are other classifications, some of them being ISSS (International Society of Soil Science), Kaczynski’s classification, and USCS (Unified Soil Classification System). |
Lab work on soil texture classification:
To determine soil texture in the lab, the mineral fractions are deposited in water (sometimes soapy water) over time.
- The first fraction that falls to the bottom after shaking the solution is the sand fraction which deposits to the bottom quite quickly – just 1 minute.
- Silt needs 1h to fully settle before measurement
- Clay needs 24h before its relative contents are measured
For a detailed experiment, see this video.
Determining soil texture in the field:
There’s a way to roughly determine your soil texture and class in the field, without the use of maths, precise measurement and waiting for 24h to get results. This method requires a bit more experience, but it’s not too hard with good instructions – you can find a great example of a field test in this video – and yes: expect to get your hands dirty!
Challenges of Clay-Rich Soils
Clay-rich soils present almost an almost endless parade of challenges that can frustrate even experienced land managers.
Soils where the clay fraction is dominant can be found worldwide. They are particularly common in regions with moderate rainfall and limited leaching, including parts of the Midwestern United States, vertisol regions of India, black cotton soils of Africa, and smectite-rich areas of Australia.
Behavior and signs of clay-heavy soils
As we’ve seen in the introduction, clay particles are microscopically small, creating an enormous surface area per unit volume. This property, combined with their sheet-like crystalline structure and negative electrical charge, makes clay soils behave in ways that are quite annoying for farmers, gardeners, landscaping professionals, and even civil engineers!
Signs To Look Out For?
One of the most visually striking features of clay-rich soils is the formation of deep cracks during dry periods. These are an obvious sign that we’re dealing with a “vertisol” – clay-rich soil with high amounts of montmorillonite (a distinct type of mineral).
The cracks occur because clay particles shrink substantially as they lose moisture. They can extend several feet deep and be wide enough to trap small animals or damage infrastructure.
While alarming, the openings actually provide temporary pathways for water infiltration during the first rainfall after a drought.
When it’s too wet, clay is very sticky underground and either too sticky or too slippery on the surface – again difficult to work on, even with heavy machinery.
Primary issues – Drainage & Hardness Problems:
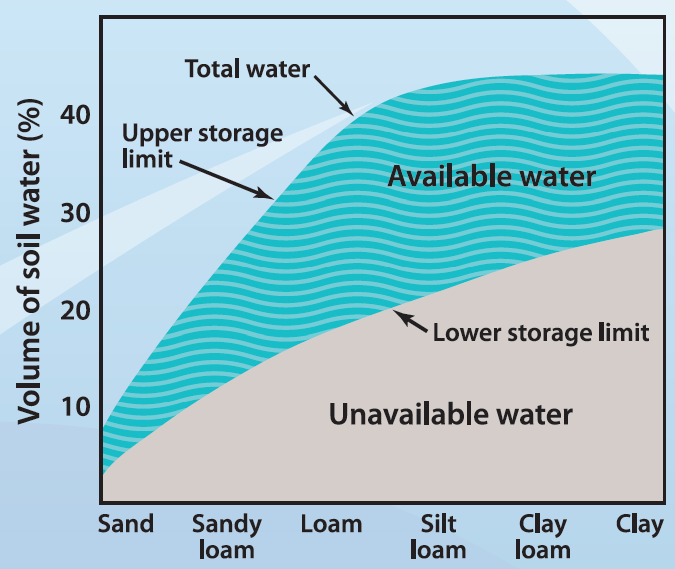
Drainage presents perhaps the most persistent challenge. The microscopic pore spaces between clay particles severely restrict water movement. Infiltration rates in clay soils can be as low as 0.1-0.5 inches per hour (compared to 2+ inches in sandy soils).
The frustrating paradox of water management in clay soils: they will remain waterlogged after rain, suffocating plant roots through oxygen deprivation, yet deliver minimal plant-available water during dry periods because they hold water too tightly for roots to extract it.
Hardness and Workability
The hardness of dry clay soil can be almost unbelievable.
If the clay content is high and it’s the right type of clay, dry soil can pack tightly, forming a concrete-like consistency that resists penetration. Farmers know that in some cases it needs specialized plowing blades to break up in stages. This soil also resists root penetration, and can make any manual digging several times harder.
This property directly translates to poor tilth and workability, severely limiting the window for farming activities and planned operations.
Compaction
Compaction occurs readily in clay soils. Their plasticity when wet means that even modest pressure from equipment or livestock can compress the soil structure, destroying macropores essential for drainage and root growth.
Once compacted, clay soils can take decades to recover their structure naturally. And that’s not even the worst of it!
Secondary issues: biological, physical and chemical
This behavior leads to so many secondary problems, each worse than the previous one:
- Reduced oxygen levels in waterlogged soil create anaerobic conditions that generate plant-toxic compounds like hydrogen sulfide.
- These conditions also reduce beneficial microbial activity while promoting anaerobic bacteria that can produce phytotoxins.
- Erosion can manifest in different ways compared to other soil types. Clay soils experience severe water erosion once saturated.
- The initial water infiltration is slow, leading to increased surface runoff in sheets rather than channels, removing valuable topsoil across entire fields.
- The pH of clay soils varies tremendously based on parent material and climate but tends toward extremes. Many clay soils in humid regions become acidic as bases leach out, while arid region clays often develop alkaline conditions.
- Clay’s high cation exchange capacity (CEC) means these soils strongly resist pH changes, making amendments expensive and slow-acting.
Nutrient management of clay soils:
Clay’s high CEC means excellent nutrient retention, but this same property can lock up nutrients, making them unavailable to plants. For example::
- Phosphorus, in particular, readily binds to clay particles, leading to situations where soil tests show adequate phosphorus while plants display deficiency symptoms.
- Nitrogen management is complicated by slow mineralization rates in clay’s often-cold, and too often waterlogged environment.
Temperature
Temperature conditions present another challenge. Clay soils warm slowly in spring due to their high water retention and thermal mass. This delays planting and early-season growth, shortening the effective growing season compared to lighter-textured soils in the same climate.
These challenges make clay-rich soils among the most difficult to manage, requiring careful timing, appropriate equipment, and long-term strategies focused on structural improvement rather than quick fixes.
Importance of Soil Testing Before Amendments
Soil testing before implementing improvement strategies for clay soils is crucial to avoid potentially expensive and counterproductive mistakes.
Without testing, you risk applying amendments that exacerbate existing problems!
The cost efficiency of testing is remarkable – a comprehensive soil test typically costs $20-60 but can prevent thousands in wasted amendments and lost productivity. Beyond standard parameters (pH, major nutrients), request tests for cation exchange capacity, base saturation percentages, and micro-nutrients to fully understand your clay soil’s chemical profile.
Pro tip: Contact the closest University that has a lab for soil testing – they will offer you a good price, some guidance, and you can be certain that the results are accurate! Here’s an example pricing for each type of test done by University of Minnesota.
Examples of chemical imbalances
For instance, adding gypsum to soils already high in sodium can worsen dispersion, creating an even more impermeable soil structure. Similarly, applying lime to alkaline clay soils (common in arid regions) can raise pH to levels that immobilize micronutrients like iron and zinc, leading to plant deficiencies despite adequate soil levels.
Without testing, you might mistakenly add magnesium-containing amendments to already magnesium-dominated soils. The calcium-to-magnesium ratio is particularly critical in clay soils. High magnesium levels promote clay dispersion and poor structure, while balanced calcium levels encourage flocculation.
You may have adequate phosphorus levels that are simply unavailable due to fixation. Without testing, continued phosphorus application creates environmental runoff risks without addressing the real issue – the need for organic acids to liberate bound nutrients.
“Less Than Desirable” Elements:
Clay soils may contain high levels of potentially problematic elements like aluminum or manganese that become active under certain pH conditions (acidic). Testing helps identify these threshold points before amendment programs push soil chemistry into problematic ranges.
Physical, Chemical, and Biological Soil Improvement Methods for Clay Soils
Clay-rich soils can be amended with plenty of methods to choose from, but choosing the wrong one in the wrong circumstances can lead to an irreversible disaster. They require careful approach, but luckily there are multiple paths to choose from.
Improving Clay Soil Without Tilling
No-till improvement of clay soils is not only possible but often superior to tillage-based approaches for long-term structural development. Several effective strategies exist:
Sheet mulching (also called lasagna gardening) creates immediate planting opportunities without disturbing existing soil structure. Layer cardboard or several sheets of newspaper directly over existing vegetation, then add alternating layers of high-nitrogen materials (grass clippings, kitchen scraps) and high-carbon materials (leaves, straw) to a total depth of 8-12 inches. This approach creates immediate planting medium while gradually improving the clay beneath through biological activity.
For established lawns on clay, implement core aeration followed by topdressing with compost. Remove soil cores 3-4 inches deep, then apply ¼-½ inch of quality compost, brushing it into the aeration holes. Repeat this process annually to gradually build organic matter without disrupting the turf.
Strategic mulching absolutely works on clay soils when properly implemented. The key is establishing edge containment – either physical edging or densely planted perimeter vegetation that prevents lateral movement during heavy rain. For flat areas, hardwood mulch (2-3 inches deep) remains relatively stable even during intense precipitation.
Cardboard between raised beds creates effective temporary pathways on clay soils. For durability beyond a single season, place 1-2 inches of wood chips atop the cardboard. The cardboard eventually decomposes, but by then, the wood chips have begun creating a stable walking surface. Without this protective layer, cardboard quickly deteriorates under foot traffic, especially when wet.
Living mulches offer another no-till approach. Low-growing, shallow-rooted plants like white clover or creeping thyme create surface coverage while allowing deeper-rooted vegetables or perennials to access the soil below. These living mulches add organic matter through root turnover while preventing surface crusting common to bare clay.
For larger areas, consider the “chop and drop” method with dynamic accumulators like comfrey, which produces enormous biomass several times per season. When cut and left in place, this material gradually improves surface soil structure without disturbance.
Tilling Clay Soils – Pro Tips
Physical improvement begins with minimal disturbance during inappropriate moisture conditions – the old adage “never till wet clay” exists for good reason. Working clay when too wet destroys aggregation and creates compaction planes that can persist for years.
Strategic tillage, when performed correctly, can temporarily improve clay soil structure. Chisel plowing to 8-12 inches without inverting soil layers helps shatter compaction while maintaining biological stratification. For gardens and smaller areas, double-digging beds (removing topsoil, breaking up subsoil, then replacing topsoil) creates immediate improvement but demands significant labor.
Adding Coarse Materials – The Extreme Fix
Amendment with coarse-textured materials represents the classical physical approach.
Most practical is the addition of expanded materials like perlite (not vermiculite) or pumice in garden settings, which create permanent macropores.
Adding Sand To Clay Soil – Solution or Disaster?
Incorporating >50% by volume of coarse sand (not fine sand, which worsens drainage!) can permanently improve structure. As you can tell by the exorbitant percentage requirement, this method requires enormous quantities to be effective.
Risks of Sand Addition – Doing it The Right Way!
Adding sand to clay soil represents one of the riskiest amendment strategies, with potential to create worse conditions than the original problem. The cement-like result you’ve heard about is unfortunately real and stems from specific physical interactions between clay and sand particles.
- When fine sand (particles 0.05-0.25mm) is mixed with clay in insufficient quantities, the tiny sand grains simply fill the small voids between clay particles, creating an even denser, more impermeable mixture.
- This phenomenon closely resembles how fine aggregate works in concrete production – the sand fills spaces between larger particles, allowing less water movement rather than more. The resulting material can indeed set almost concrete-hard when dry.
The critical threshold for effective sand amendment is approximately 50-70% sand by volume. Below this percentage, you risk creating this concrete-like structure.
This threshold explains why many soil scientists advise against sand addition entirely – the quantities required are often logistically and economically impractical.
For perspective, amending just the top 6 inches of a 1,000 square foot area would require approximately 25 tons of coarse sand to reach effective levels! You’d end up with a decent clay:sand mix that is 10-12 inches deep.
For lawns, a similar effect can be achieved by seasonal aeration and incorporating sand in the open pockets. It would be much more acceptable than dumping tons of sand immediately and then working to mix it all well in one go.
Coarse Sand Vs Fine Sand
Apart from proportion to clay, the sand’s particle size distribution is the second pillar, equally as important as the first one!
Coarse sand (0.5-2.0mm) is significantly more effective than fine sand.
Using mixed-grade “construction sand” or “fill sand” often exacerbates problems! These products contain significant fine sand fractions.
Mason’s sand or specifically graded “sharp sand” provides better results, though at higher cost.
Mixing Sand And Clay – How To Do It?
The mixing process itself presents challenges. Inadequate mixing leads to pockets of sand and clay rather than a homogeneous medium. Thorough mixing requires mechanical tilling to at least 8-inch depth, contradicting low-disturbance soil management principles.
In high-rainfall environments, sand amendments can lead to unexpected settling and subsidence as the material redistributes over time. This settling creates depressions where water accumulates, ironically worsening the drainage issues you attempted to fix.
If you remain committed to sand addition, consider testing it out in a smaller area first!
Chemical Methods of Fixing Clay Soil Properties
Chemically, calcium plays the crucial role in clay improvement:
- Calcium ions help clay particles flocculate (cluster together), creating aggregate structures with larger pore spaces between them.
- Gypsum (calcium sulfate) applications often dramatically improve clay soil structure without changing pH.
- For acidic clay soils, lime (calcium carbonate) serves the dual purpose of raising pH while improving flocculation.
- Application rates typically range from 50-100 pounds per 1,000 square feet depending on starting pH and buffer capacity.
Biological methods of improving Clay Soils
Biological approaches often yield the most sustainable improvements.
- Organic matter acts as both glue and spacer in clay soils, with particular emphasis on partially decomposed materials.
- Materials high in lignin and other recalcitrant compounds (wood chips, straw) persist longer in soil than easily-degraded materials (fresh grass clippings, kitchen scraps).
- The mushroom-like smell of healthy clay soil comes from actinomycetes and fungi that help bind clay particles into stable aggregates. Live fungi products can be bought online for a long time now, and are booming in popularity.
- For intensively managed systems, consider “active carbon” additions like biochar or humates, which provide immediate habitat for microorganisms while persisting in soil for decades.
All these biological materials offer medium to long-term improvement to clay’s physical and chemical properties. Their high cost does limit application to high-value crops or garden settings, though.
Cover Crops for Clay Soils
Cover cropping represents the most cost-effective biological improvement method.
Deep-rooted cover crops like daikon radish physically penetrate compacted layers, while their decomposition creates continuous macropores.
The root exudates from living plants feed soil microorganisms that secrete glomalin and other soil-binding compounds. Mycorrhizal fungi, which associate with 80% of plant species, extend this process beyond the immediate root zone!
Some weeds like dandelions can tell you exactly where compaction is preventing other plants from thriving. The presence of abundant dandelions often indicates soil compaction issues. They’re actually excellent biological soil drills in clay-dominated soils.
For practical land management, consider selectively allowing dandelions in strategic locations (orchard understories, field margins) while controlling them in high-visibility areas. Harvesting dandelion greens for consumption or composting captures their accumulated nutrients while preventing seed formation.
Practical Solutions For Different Budgets (With Price Estimates!)
Improving drainage in clay soils requires understanding that water movement involves both infiltration (entry) and percolation (movement through). Addressing both aspects gives the most complete solution.
Very Low-Budget Solutions:
For those with limited budgets, raised planting areas provide immediate results with minimal expense.
- Even raising beds 6-8 inches above grade dramatically improves drainage by increasing gravity’s pull on water.
- This can be accomplished simply by mounding soil from pathways onto planting areas, creating a no-cost raised bed system.
- For vegetable gardens, 8-12 inch high beds work well, while perennial plants like shrubs benefit from broader, gentler mounds.
Strategic placement of plants can maximize natural drainage. Planting cultivated plants on slope shoulders rather than depressions takes advantage of natural topography.
For lawns, accepting seasonal wetness and selecting appropriate grass species (fine fescues, certain ryegrasses) may be more practical than attempting structural changes to the entire area.
Inexpensive vertical drainage can be created using the “vertical mulching” technique:
- Drill 2-inch diameter holes 18-24 inches deep using an auger, spacing them 2-3 feet apart in problem areas.
- Fill these holes with coarse sand or fine gravel, creating permanent drainage channels through compacted layers.
- This approach costs approximately $50-100 for a typical quarter-acre lot.
Moderate-Budget Operations
For moderate budgets, incorporating organic matter remains the gold standard.
Annual additions of 2-3 inches of compost to garden beds builds long-term structure. For larger areas, implement a rotational approach, intensively improving different sections each year.
Municipal compost, often available free or at minimal cost, provides an economical source of organic matter. Transport is another story, though, and the final cost depends on many factors: Do you already have the transport vehicle? How far do you have to go? How many rounds do you need to drive to get all the materials? Etc…
Cover cropping offers exceptional value!
- Seed costs typically under $30 for 1,000 square feet. Choose species with aggressive taproots like tillage radish, alfalfa, or sweet clover for compacted clay. The “biodrilling” effect of these roots creates channels that persist even after the plants die.
Mid-range drainage solutions include French drains constructed from perforated pipe wrapped in landscape fabric and surrounded by gravel.
- A DIY approach using 4-inch pipe costs approximately $2-4 per linear foot compared to $15-30 per foot for professional installation.
Expensive Operations
Higher-budget solutions include mechanical soil mixing to depths of 18-24 inches, incorporating significant quantities of sand and compost throughout the entire root zone.
- While expensive ($5-10 per square foot), this approach creates immediate and dramatic improvement.
Subsurface drain tile systems represent the most comprehensive solution for severe drainage problems.
- Modern corrugated plastic pipe systems can be installed by homeowners with equipment rental for approximately $1-2 per square foot, compared to $5-8 for professional installation.
Finally, reconsider design expectations before embarking on expensive drainage projects.
Creating rain gardens that temporarily hold water while slowly infiltrating can transform drainage “problems” into aesthetic and ecological assets. This approach works with the soil’s natural properties rather than fighting against them.
Clay Soil Long-Term Management (All 4 Seasons)
Clay-dominated soil will display some pretty dramatic seasonal changes that demand a more hands-on approach if you intend to use it for any organized production or even something uniform like a lawn. Here are our suggested management strategies to use throughout the year:
- Winter: freeze-thaw cycles in cold climates naturally improve clay structure as ice crystals force soil particles apart, but there’s basically nothing to do in the winter except waiting.
- Early spring: no doubt the greatest management challenge! Thawing clay soils hold maximum moisture for a long time. Be patient! Working wet spring clay creates compaction that persists all season.
- If you have the luxury, install soil temperature probes at 4-inch depth and wait until readings consistently reach 50°F before cultivation.
- Raised beds drain and warm significantly faster than flat ground, offering earlier spring planting opportunities.
- Late spring brings the optimal working window for clay improvement. This period between “too wet” and “too dry” may last only 1-2 weeks, but represents the ideal time for incorporation of organic amendments.
- Make sure you prepare the amendment materials before this window opens (for the sake of efficiency).
- Summer heat transforms workable clay into almost brick-like hardness. Maintain consistent soil moisture through drip irrigation and substantial mulch (3-4 inches minimum).
- Summer cover crops with aggressive taproots like buckwheat or cowpeas capitalize on warm soil temperatures to penetrate compacted layers. For unplanted areas, consider white plastic covering to reflect heat and maintain workability.
- Fall offers a second opportunity for major soil improvements. Post-harvest incorporation of organic matter, followed by planting winter cover crops like cereal rye, takes advantage of moderate temperatures and natural rainfall.
- Fall-applied amendments have months to integrate before spring comes. Use this to your advantage:
- (a) apply slow-acting organic fertilizers. Some mineral fertilizers like rock phosphate are also slow to integrate.
- (b) apply surface amendments without disturbing the soil, letting them penetrate into the soil by leaching slowly and naturally reaching the root zone by spring.
- (c) apply gypsum or lime, both of which need months to fully alter the pH of the soil.
- Leaving clay soils roughly tilled in fall (in agricultural settings) maximizes surface area exposure to the beneficial freeze-thaw effects.
- Fall-applied amendments have months to integrate before spring comes. Use this to your advantage:
Note that snow insulation actually moderates soil temperature fluctuations. This makes fall removal of excessive mulch beneficial in colder climates to promote deeper freezing.