In this article, we’ll be going over what I think are the most essential tools and equipment for beginner gardeners starting from scratch.
Introduction:
Lately, I’ve been thinking about the overwhelming decision-making problems that beginner gardeners face:
- The costs associated with starting from scratch
- the uncertainty of results
- the myths, pseudo-hacks and misconceptions that can make or break someone’s entire year of hard work.
There is an uncertainty that farmers, gardeners, and homeowners have to come to terms with. Anyone trying to grow plants for a purpose – whether it’s a beautiful lawn or a basket full of apples, lettuce and carrots – instinctively feels this uncertainty.
Some level of failure is almost inevitable, but at the same time it doesn’t really have to come with a huge cost that will completely demoralize us.
After trying out many big and small farming and gardening tools, I can safely say that I am not by any means a minimalist when it comes to tool usage and collection. But at the same time, I’m not aspiring to be a power user either.
To clarify, I would love to build a huge collection of job-specific tools, but in my use cases I don’t see a need for any of the big guns like a BCS Matra 300 mulcher (which I’ve used and it’s amazing at what it does), or a motorised tiller. However, if I were working with acres of harder soil which is consistently getting invaded by weeds, or had to mow an enormous lawn, that’d be a different story.
But… what if I were a minimalist? Or a beginner?
In this article, I tried to answer the question:
- What would be the most essential tools I would keep if I were starting from scratch, and how much would be the total cost for all of them?
Where can we start?
Ensure no important gardening jobs or tasks get left out. There are 3 steps we can take to make sure this happens:
- Categorizing the tools will make it obvious when a category is underrepresented.
- Try to have minimal overlap in use cases. We don’t need tools that are too similar to each other – that would be a waste of our budget.
- Pick tools which can have multiple uses, so we can do many jobs with fewer tools.
Of those 3, the third step is the one requiring the most creativity, since not every “multi-tool” is actually practical. For example:
- Soil, gravel, wood and other heavy item transport is best done using a wheelbarrow.
- If you don’t have a wheelbarrow, you can use a substitute: a garden spade, a wide shovel, a bucket. Some of these substitutes are much more suitable than others!
- Similarly, if you lack a hammer, you could also use a pickaxe to hammer a nail down. But it’s a poor long-term substitute.
Since there is almost no end to how far you can go in terms of cost, we’ll be considering the long-term planning of expenses.
Important note:
Farming and gardening are activities where every little bit of savings makes a huge difference when combined! If you can use a regular wooden stick or a piece of paper, or a plastic bag to finish a job – just do it. Don’t buy the small specialized materials and equipment, at least until you absolutely have no alternative.
The goal is to make the starting expenses low so you can invest in the actual plants and still have leftover budget for investing in things that you’re lacking. The point is to find out what you’re lacking from your own personal experience!
If you end up enjoying gardening, next year will be the next round of investments, so you’ll invest again, but this time you will know exactly what it is you need – you’ll be making a much more informed decision than in the first year.
A Breakdown of Tool Categories
I’ve decided to group the tools based on the simplest possible breakdown of what goals we’re trying to achieve and what are the things to be “touched” or manipulated by the tool?
To cut to the chase, this is how I went about it:
- Tools for soil work (including sand, gravel, sometimes mulch, etc.)
- Tools for plant work (including dead plants)
- Tools for water work (quantity, technique, timing and frequency)
- Tools for measurement and calculations.
- Consumables and materials: rope, tape, labels, seeds, pots, wood or metal frames, sand/gravel, compost, fertilizer, wire, stakes, mulch, cover foil, protection nets, bags and more.
If we include measurement tools, consumables and materials, you’ll end up reading a book instead of an article.
Which is why they’re going to be omitted in this piece:
- For measurement: we can just say that for most essential measurements, you can make your own tools (a rain gauge from a bottle), or you probably already have them (rope, measuring tape, even a footstep is precise enough to measure distance in most cases). Other measurement tools are either for advanced users (tensiometers) or just way too expensive to be in a list of “essentials”.
- For consumables: the range is extremely broad and so are prices. Everything depends on what is being planted, in what way is it being done, how big the area is, and what kind of climate/season it is. Even the quality of seeds, for example, will be wildly different with a huge price range. Most of the budget spent on “consumables” will fall under a yearly expense anyway, and this article only covers tools that can serve you for a long time.
However, for the sake of usefulness, we will include an estimate of price for at least some consumables and materials at the end of this article.
Pro tip:
If you have some one-off tasks to do, you can always just borrow tools from neighbors. Be a good sport and treat them with a coffee or maybe some salad from your garden. The gardening community is exceptionally receptive to newcomers and sharing is mostly OK as long as you take care of their tools. Some have bad experiences with lending tools and will be more reluctant to share. Don’t take it to heart.
Garden & Yard Tools For Soil Work
Let’s start building this list from the ground up! Pun intended. In terms of soil work, there are really only a couple of things we need to do:
- Break up soil (deep or shallow tilling work)
- Transport soil (short distance – grading or leveling, plus long-distance)
To that end, here are our first recommendations for tools:
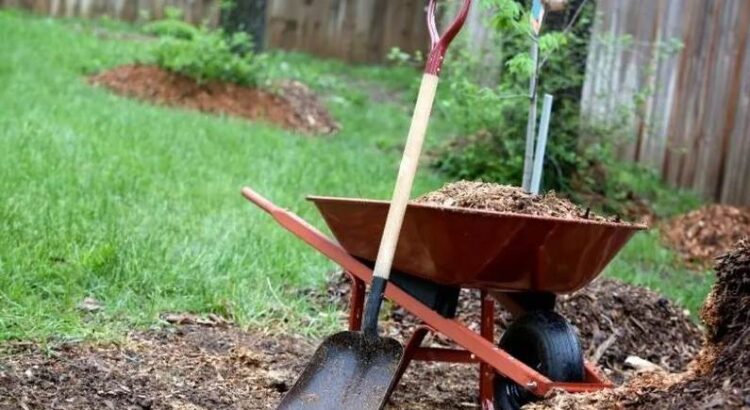
#1 – Wheelbarrow
The wheelbarrow is a simple, long-lasting logistics solution. It can cover most transportation use cases, and amplifies your own strength using the simplest laws of physics. One wheel, and a whole lotta leverage!
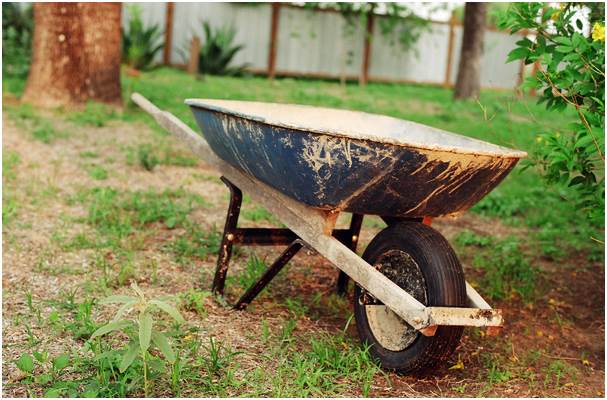
If you’re the workhorse in the garden, the wheelbarrow is your chariot. Investing in a good wheelbarrow will be absolutely essential. A used one can also do the trick, it really doesn’t have to be new.
A wheelbarrow will make it so you can see the garden transforming within mere hours, as long as you have a plan and an idea of what you want to do. So what can you do with a wheelbarrow:
- Transport dirt at a longer distance, as well as sand, gravel, and landscaping stones.
- Mix soil with compost or fertilizer inside the wheelbarrow, then dump it where needed.
- Carry grass cuttings, leaves, stems, branches and more to a compost pile.
- Move around entire sets of other tools, bags, boxes etc while you work within the garden.
- A temporary portable toolbox so you don’t lose any important tools (or smaller bags) in the grass or dirt.
- Transplanting plants from one place to another? Put them all in a wheelbarrow and off you go!
- Easily move clippings, branches, leaves, larger pieces of lumber, or firewood, and more.
Farming and gardening are physically demanding especially when starting from scratch. A wheelbarrow will save your back and keep you from getting exhausted.
If you can’t afford a wheelbarrow:
- strap any large plastic tray, hard plastic basket or big bucket to a set of wheels and add some handles.
- Anything is better than hauling loads manually.
- Be creative!
#2 – Long-handled Round Point Shovel
Of course, you’ll be using it for shoveling (duh!) as well as digging. Make sure you get one that has a slight angle between the handle (shaft) and the blade!
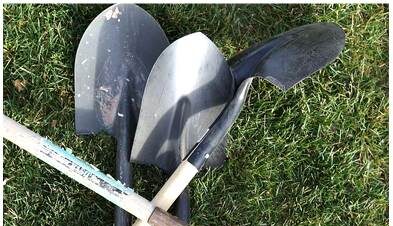
It can then be used as a decent substitute for a flat headed shovel, while the round point will make it useful for digging things out or turning soil. Don’t expect it to be easier to use than a spade for digging into compacted dirt, but it’s an OK substitute.
I’ve personally used it for turning soil manually (just like my late grandfather, for decades), and also dug out plenty of unwanted plants along with their roots.
Take some time to learn the proper shoveling technique – use your legs, not your back. Otherwise you’ll be regretting starting your new hobby after a single day of work.
In some hard compacted soils (like dried clay-rich soils) it’s gonna be a problem if you try to use it as a digging tool for too long. It gets tiring. Don’t dig through these soils when they’re too dry.
#3 – Wide Grub Hoe (Eye Hoe)
Out of all the tool categories, I believe hoes rank near the top in terms of variations in sizes, shapes and specific purposes. Hoes can be used for many things. Like the shovel, it doesn’t end with just moving dirt. But the hoe is one step closer towards plant management, and away from pure soil work.

For this reason it was very difficult to pick just one type. If there’s any chance you can get more than just this one, without it costing too much, grab that chance!
The reason I love and recommend the grub hoe (or eye hoe) is for efficiently covering much of the soil tasks. The weeding function is secondary to me, and more circumstantial.
Let’s dive into the use cases:
- Hoes are used for controlling weeds between rows before they take over. The more specialized lighter ones are the single best tool for maintaining weed-free paths and spaces between plants.
- Hoes are also used for breaking up the soil surface, and superficial to medium-deep tilling.
- A sturdy, wide hoe can cut through most roots and also doesn’t mind hitting the odd rock here and there.
- If you want to do low-depth soil shifting in order to create channels, raised rows or mounds for potatoes – this is the tool!
Making raised rows and channels is also why I personally wouldn’t pick to have just a single narrow hoe or one that’s solely for weeds. A bigger, wider head would be much better for this purpose, and the shape (square or semicircle) doesn’t really matter all that much.

I’m used to using the semicircle one (C) and prefer it because I can rotate it 90 degrees and then dig more precisely with just the edge of the semicircle. It’s also wide enough to move a lot of dirt when making mounds for raised beds.
Of course, you pick what best suits your purpose!
A word of warning:
Swinging a heavy tool towards your body is not something to do when tired, dehydrated or distracted. These tools can do just as much damage as a 10000+ RPM power tool. Axes, long-handled bill hooks, mattocks and pickaxes carry the same risks. Here’s a decent video demonstration, although the presenter clearly has experience and doesn’t mind the hoe landing close to his foot.
Gardening Tools For Plant-related Work
Now we’re getting into the meat of it – let’s migrate over to tools that we’ll use to follow up on the basic soil work that we’ve done with the shovel and hoe.
When it comes to plants, we need to acknowledge several simple facts, and then the tool choice will hopefully become more obvious:
- Fact 1: There are desirable and non-desirable plants – both are going to grow in the same garden and need to be managed with different tools.
- Fact 2: A grass lawn, vegetables, shrubs, fruit trees are plants with different shapes and forms, and they bear different kinds of usable or edible parts. What we want to grow and harvest will dictate what tools we need to use.
- Fact 3: Plants have seasonality and life-cycles! We will use different tools in different stages of the plant’s life.
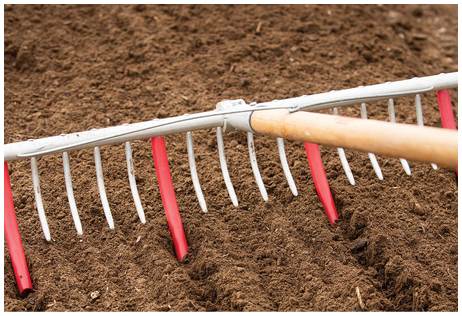
#4 – Heavy-duty Steel Garden Rake
I named it “heavy duty” to differentiate from the rakes that are only used for collecting leaves and grass cuttings. This is what you should be looking for:

There’s no reason why this tool was included in the “plant-work tools” section, but I feel like I’ve personally used it for raking dead grass, twigs, roots, weeds and leaves much more than soil spreading or leveling. So, for me that was always its primary purpose.
However, a good sturdy rake is a super-useful, multi-practical soil and plant manipulation tool. In the opening chapter for soil tools, I mentioned that one of the things to do with soil is transport it. A rake is a good tool for grading and leveling already cultivated soil.
Once the soil is broken up with a shovel and hoe, then maybe even transported with a wheelbarrow, the rake will serve to break it down further and spread it around evenly.
Note:
Never ever leave a rake on the ground with the spikes facing up! In fact, try to always lean it on something, and be careful not to step on it.
The back of a rake is flat (unless you’re using a double-sided rake), so it can be used for the final surface leveling touches.
But there’s more to a rake than just those couple of use cases. You can use it as a measuring tool for row spacing or seed planting if you can find something longer to stick on some of the spikes. Some people just use plastic or hard rubber tubes for this.
#5 – Garden Scissors or Pruning Scissors – Secateurs
Pruning scissors (secateurs) are useful for harvesting vegetables, trimming plants, and other cutting tasks. Don’t use them for cutting wire, and they’re also not really suitable for paper, cardboard, plastic foil and such.
Secateurs are not useful until you actually have something to harvest or prune. But they’re still a good sturdy cutting tool which can always find some use.
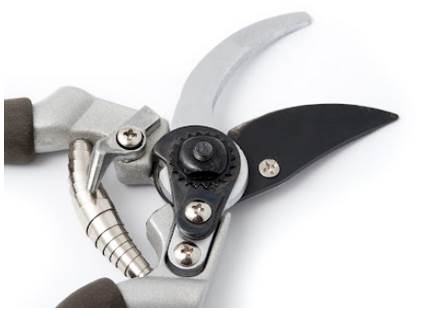
The difference between quality pruners and cheap ones becomes apparent within one season of usage. Don’t buy the more expensive ones in your first season. Take the cheaper ones, and if a branch is too thick for them, just use another tool to cut it.
At first, I suppose you’ll be using them for trimming thin branches and leaves. Of course, also for harvesting, if you reach that point. You can even delay this purchase until later in the season if you have alternative cutting tools.
Realistically, you may not even need secateurs, at all. Pruning thick branches isn’t something you’d need to do in the first year unless you’ve inherited an orchard. And other bladed tools can be used for harvesting, too.
One of the best beginner gardening scissors that I know of are these cheap Chinese gardening scissors whose exact name I can’t even find. Try searching for “rubber handle Chinese scissors”:
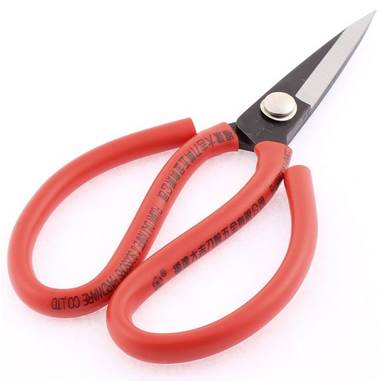
Save the bigger expense for other tools. These cost less than a McDonalds cheeseburger, and you can use them in the house as well as harvesting.
I’ve also used these exact scissors for drilling seed holes. They are surprisingly sturdy and very pointy – you can puncture a hole in just about anything. Sadly, they are not suitable for cutting woody branches.
Some purchasing tips:
- Search for the ones with rubber-covered handles
- make sure the openings are big enough to fit while wearing gloves, too.
- Not every piece is the same quality – some might be nicked or loose due to poor QA.
- Check 3-4 pairs before buying, and then pick the best one.
#6 – Garden Trowel Or An Entire Gardening Set
Small hand tools like the humble garden trowel are mostly used for maintaining already prepared and loosened soil around existing cultivated plants, or during the planting stage.
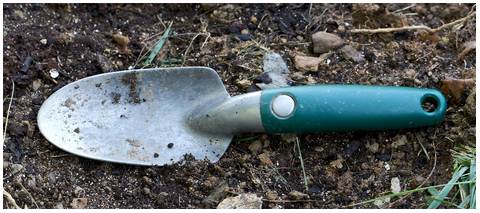
A garden trowel is a cheap tool for precision manual work that functions as a miniature shovel. You’d use it when opening up holes for transplanting as well as precision weeding to a depth where you can scoop out most of the root system even for deeply rooted weeds.
Worth noting:
A trowel might bend or break if you’re trying to dig up a lot at once and the soil is too hard to work with.
It’s common to see small garden tools like these packed in sets of 2, 3 or more. Some sets come with a hand cultivator, a seed hole puncher (dibber), etc. The prices are also very affordable.

You should also be able to find cheap versions of a soil knife (also known as a hori-hori knife) that has depth notches and longer but narrower blade, making it more suitable for digging in compacted soil, and cutting weed roots. Sometimes one edge is serrated for this purpose.
My advice would be: do not pay for any of the more expensive hori-hori knives in your first year of gardening.

I will always rather buy (or make) a set of 3 different smaller and cheaper tools than one expensive piece that has multiple uses but costs significantly more:
- If I need a blade, I use a regular knife – one that presumably won’t get shoved into the ground often and become dull after 3 days of use.
- If I need to cut something thicker outside of the soil, pruners are the next choice.
- Need depth measurement notches? Make notches on any stick and use it only for that.
And just like that, we saved $30-40 which we can put elsewhere.
#7 – Long-handled Bill Hook (Brush Axe)
You will run into soooo many different names for this thing. There is no point in trying to use just one name, so it’s better to show you a picture and then your job will be to find out anything that matches this appearance:

The names you’ll come across for this tool are:
- Bill
- Sling blade
- Kaiser blade?
- Kosir (kosijer)
- Briar axe
- Bush axe
- Brush hook
- Long-handled slasher
- Irish slasher
- Brush clearing sickle, etc.
As far as I could tell, every continent has their own versions of this tool, some are used for heavy cutting (kaiser blade), others for light work. Some have more safety features (Swedish brush axe), some have shorter handles…
This thing is extremely useful and I’m surprised that it’s not being recommended by more people. You should be looking for the following features:
- Long but light handle (longer is better; ideally ~1m)
- Blade with a hook
- The blade only curves forward – not backward, and not backward followed by a forward hook.
- Blade that is not too heavy – it has to be narrower and lighter than what a kaiser blade looks like)
- Only the inner side of the hook should be sharp – outer edge should be dull
It’s mainly used for clearing brush, branches, even smaller trees in some forest clearing activities. If you can get it under a root and have something to put under it as a fulcrum, you can also use this to cut some hard roots without swinging it downward and into the ground.
This type of brush sickle is somewhat safer and much lighter than a machete of the same length, but it’s used for cutting the same kind of materials as the machete. I prefer to have a shorter blade, but a much longer handle for better reach.
I’ve also used it for some light firewood chopping because that one was pretty sturdy and could take a beating. The lighter and thinner ones won’t be suitable for that. It wasn’t my own tool, so I didn’t want to overuse it outside its original purposes. I wouldn’t try to chop any hard wood or firewood with lots of annoying knots in it.
Yet another safety note:
This is another one of the more dangerous tools that you need to be careful with. The heavier versions require lots of upper body strength to both be effective and control (stop the inertia after a cut). When cutting branches above you, make sure you protect your head and especially eyes. Branches can fall in unexpected directions.
#8 – Lawnmower or Strimmer (String Trimmer)
If you don’t plan to maintain any large grassy areas in your garden or yard, just skip this tool entirely. But I have one good reason for including it in the list:
There is only one potential substitute tool for maintaining turf or lawn, and that would be a scythe. And no one wants to deal with scythes anymore, so here we are:

Most people don’t live in a desert so I consider maintaining a lawn as basic homeowner activity. One thing you can’t do with grass is maintain it with just a pair of scissors.
I’m going to assume that a beginner will start off with a wild piece of land that needs to be worked on heavily in order to “domesticate” it. Maintaining it in this state is already going to be hard work, regardless of whether you’re using it for farming purposes or just establishing a neat lawn.
That’s why my final “plant-work” tool recommendation is going to be a lawnmower. Starting your gardening journey by mowing down overgrown areas is a good way to prepare yourself for the hard work ahead, and to see immediate effects of your labor.
For easier decision making, I made a good comparison list between a reel mower (rotary mower), a trimmer, and a lawnmower:
| Reel Mower | Trimmer | Lawnmower |
| Lowest price | Medium price | Medium-high price |
| Cuts lawns well – metal blade | Whacks and rips grass – not a clean cut | Cuts lawns well – metal blade |
| Can’t cut near obstacles | Cuts near any obstacle or fence | Can’t cut near obstacles |
| Low risk of damage from stones | No risk of damage from stones | High risk of damage from stones |
| Bumpy terrain could be an issue | Terrain is not an issue | Bumpy terrain is an issue |
| Not great for tall grass | Cuts any length of grass | Cuts any length of grass |
| Relatively easy to control height, but only up to a point | Requires more care to get an even height everywhere | Relatively easy to control height, but only up to a point |
| No power source required | Gasoline, electric cord or battery | Gasoline, electric cord or battery |
| Clogging risks from almost all branches and twigs | Branches and twigs don’t stop the cord from spinning | Twigs are not a problem, thicker branches can be an issue |
| Quiet | Noisy | Noisy |
| Tool is powered by being pushed but it’s on the ground | Entire tool with fuel and motor is carried by shoulder straps | Tool is easy to push and on the ground |
| Broad cutting path (width) | Narrow cutting path (width) | Broad cutting path (width) |
| No protective gear required | Eye, hand and leg protection recommended, even with a guard. | Some foot and shin protection required |
More on push reel mowers:
- Sharpening them can be a bit more complicated if you’ve never done it before
- On wet grass, they can slip or slide instead of powering, depending on the wheel grip.
- May need multiple passes to achieve a uniform cut.
- Surprisingly fast!
- They are OK for maintaining existing lawns, not so much for clearing and establishing a lawn.
More on string trimmers (weed whackers):
- If the guard isn’t good enough, they will send grass and debris everywhere – you will need shin, eye, hand protection.
- Not really designed to “mow the lawn” but it can do that, too (just not as well as a lawnmower
- Carrying can be tiring or uncomfortable – bad choice for large surfaces.
- Good for cutting between rows of cultivated plants, or between densely packed raised beds where a mower can’t fit
- Never gets stuck, but the string can break off so it has to be pulled out again.
More on lawnmowers:
- Needs foot and shin protection sometimes, depends on terrain
- The blade is good at cutting, but when it’s dull, it whacks more than cuts (same as a trimmer)
- Gasoline-powered ones are usually more powerful
And now for the most “fun” alternative…
#The Scythe – A Cheap Alternative, With Some Beginner Tips
So when was the last time you’ve seen anyone using a scythe outside of a local rural festival competition? Why do you think that’s the case?
Unfortunately for inexperienced users, a scythe might be too complex to start using effectively right off the bat. It’s bulky and awkwardly balanced, and the swing will always use the same side of your body’s muscles. It’s easy to see why this tool rarely gets recommended. But for clearing overgrown grassy areas on a near-zero budget – this is the tool!
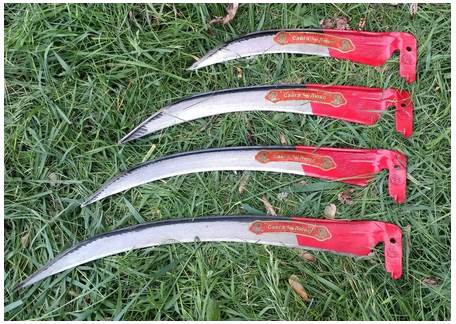
It will cut thicker stems of tall plants, but it’s not good for clearing hard wood like tree saplings. If you think you’ll be just fine with a simple scythe, try the following:
- Avoid using a longer blade to start with
- Don’t try to cut a lot in a single swing.
- Take it slow, practice a bit first.
- Take regular breaks. It will take a toll on your back before you even start feeling it, unless you’re cutting down just a small area.
Overgrown terrain can hide bumps, holes, rocks and uneven parts where if you’re cutting too low, you can snag, bend or otherwise damage the tip of a long-bladed scythe. Medium-length blades are easier to manage for beginners. They’ll keep you from getting greedy and making dumb mistakes when you’re tired, but they’re slower to get the job done.
A scythe would be impractical if you want to spend time and energy gardening instead of cutting grass. Plus, it can only cut in an open field. You want to make maintenance less cumbersome and less time-consuming. A scythe also has to be sharp at all times, otherwise it doesn’t work. If you buy a scythe and you don’t have a sharpener, invest in one – it’s not expensive.
Note:
Check your surroundings often when you’re swinging this thing! Make sure your kids and pets are kept far away from where you’re working. The scythe won’t be as dangerous to you as much as your surroundings, but it is VERY dangerous in the hands of a beginner.
Gardening Tools For Irrigation
Irrigation is my specialty, so this section can (and will) become an entire article by itself one day. But for now, I’ll keep it simple and distill the basics of irrigation down to a couple of key points.
The key questions to answer when irrigating any plant are:
- How much water do you need?
- What will be the ways (techniques) of sourcing and delivering water?
- What time of day will irrigation be performed?
- At what frequency should each plant receive its serving of water?
An irrigation engineer will use their knowledge and experience to answer the questions above by getting some basic information from the farmer, homeowner or gardener:
- What plants are you planning to grow (now and in the far future)?
- Where are you located?
- What is the surface area and/or number of plants in the irrigation schedule?
- What is your terrain configuration like?
- How much water is available to you?
- Are you using a private or municipal water source, and what are the limits?
- How far is the source of water, and do you need a pump to deliver it?
- Does the source ever go dry?
- What kind of pressure can you count on during peak consumption season?
- What is the quality of the water at the source? (or: should we use a filter?)
- What is your budget for irrigation equipment?
There are many different techniques you can use to source water and deliver it to your plants, but only one simple tool has made it to this list – and that is the humble water hose with a simple sprinkler.
#9 – Watering hose with sprinkler head
Honestly, this is the only watering tool a beginner needs to buy when they’ve made all the other necessary preparations for gardening. Why, you ask?
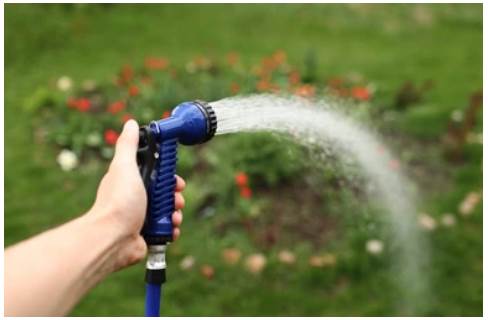
Let’s say you’re just using a water can or a bucket. Compared to a simple hose, you will end up with:
- No option for fine droplet sprinkling
- Less control with more water loss,
- spending infinitely more time and energy carrying water around,
- being stuck without an upgrade path.
Season 1: Only The Bare Minimum And A Desire To Learn
You must think I’m crazy, but I can safely say that 70% of irrigation “technique” is actually knowledge and experience to make the right (informed) decisions. Namely, what specific irrigation tools, materials and consumables to buy and implement in that specific situation. The buying and implementation make up <30% of the entire effort.
If you don’t spend enough time in careful planning, you might end up with one or more of the following issues:
- Irrigating with poor-quality water that can clog up sprinklers, or hurt your plants
- Buying the wrong type of pipe sizes
- Burying pipes at the wrong depth
- Not being able to properly de-winterize (flush) your system
- Buying the wrong pump with the wrong capacity
- Drilling a well in the wrong spot
- Wasting tons of water every time you irrigate,
- and so on…
Believe me, more complex systems can be extremely expensive with dozens upon dozens of failure points. The chance of mistakes needs to be at the absolute minimum. Even then, expect to make some extra adjustments along the way.
For beginners, it’s going to be best to do everything manually at first. Observe and learn how water behaves, what it does to your plants and soil, how it flows on your terrain, how much is being used, and if you possibly need to consider investing in a drainage system, too.
Collect data and experience as you work – then use it later when specializing the system and expanding your irrigated area.
Season 2 – implementing Expansions:
The bigger and more complex irrigation system you want, the more preparation and calculations you’ll need. After deciding on investing in irrigation in the second season, think about the following questions:
- What is your available water pressure?
- Will you be introducing new plant types (e.g. establishing an orchard)?
- What quantities of water will you be using during peak consumption?
- Should you invest in a well and pump?
- Should you integrate a water filtration system?
- How much energy are you losing (or gaining) due to terrain slopes?
Many questions like these will need to be answered as you scale up your garden.
A properly implemented irrigation system will require minimal operational effort.. Sometimes it’s as minimal as pushing a button or turning a knob for 3 seconds, and then turning it back 1 hour later. Adequate planning > maximum efficiency!
Energy efficiency is everything when it comes to long-term irrigation costs. You not only want to save water and reduce losses, but you also want to save your own time and energy.
Poorly planned and executed irrigation is usually going to be a very time-consuming activity. What you want to do is gradually develop a system that doesn’t require your presence and attention while the plants are getting watered. Except for inspection and maintenance – you’ll have to do that no matter how good you’ve set the system up.
A hose and sprinkler allows you to do expand and specialize further. In season 2, you should be switching away from the handheld sprinkler head to a stationary, oscillating, rotating, 360 sprinkler, micro-sprinkler, drip or soaking hose extensions.
These will give you many water delivery options for different kinds of plants and use cases. Not all options will be available to you, depending on what water pressure you are able to deliver to the system.
If you’re lacking water pressure, establish smaller irrigation zones. Zoning is almost always a good idea, but that’s a separate topic.
Conclusion
Gardening as a hobby is a bottomless pit – a giant cake that needs to be eaten one small piece at a time. Manage your expenses bit by bit, take your time and enjoy the process. With gardening – it’s safe to say that the journey is the goal. Try to derive happiness from the process and make as many friends along the way as possible. You will get much more value from the gardening community than any online article can provide.
Have fun!